

If you’re wondering which caves are worth your time in The Legend of Zelda: Tears of the Kingdom, don’t worry, we’ve been there. Considering there are nearly 150 caves across both the surface and sky portions of Hyrule, visiting each one of them is going to take a while — specially if you’re hunting down Bubbul gems.
This guide covers every cave that’s relevant to Skyview Towers, armor sets, and shrines. We’ve also highlighted 11 additional caves that don’t but still are totally worth your time. In total, this list comprises over 70 caves — more than enough to get all the rewards from Koltin.
How to find caves in Zelda: Tears of the Kingdom
You’re bound to stumble upon caves naturally during your travels. That said, there are a few methods to consider that will make the task a lot easier.
At a glance, here’s how to find caves in Zelda: Tears of the Kingdom:
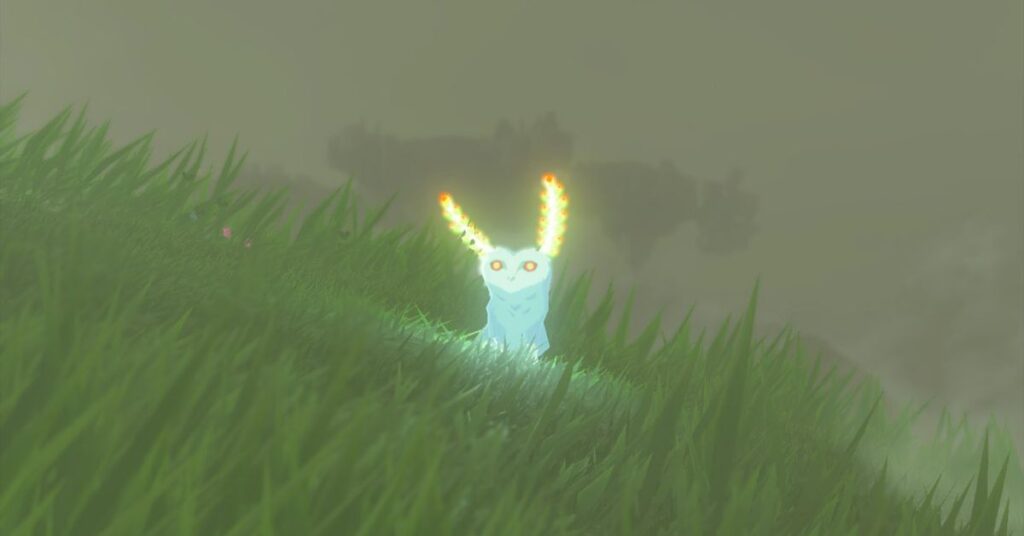
- Offer fruit to Satori cherry blossom trees.
- Follow the blupees (light blue rabbits).
- Use the Purah Pad’s Sensor+ feature to track down mining ores or keese.
- Chat to traveling NPCs, both on the roads and inside stables.

Image: Nintendo EPD/Nintendo via ProSpelare
The Satori cherry blossom trees are by far the best method. When you find one of these trees, you’ll notice a small wooden casket of sorts next to them. Open your inventory and hold any fruit — then, go ahead and drop the fruit. This will serve as a tribute for the Satori, who will highlight cave locations with bright light beams.
Now, bear in mind the cave locations won’t be marked on your map — you’ll need to manually get to them first in order to get the marker. In addition, it’s likely that the Satori will highlight caves that you’ve already discovered.
That being said, this method is still the most useful, as you’ll be able to glance at a distance and visit the ones you missed around the area. I recommend using your scope (pressing the right analog stick) and marking the spots. The light beams won’t stay in place forever, but your markers will. If anything, you can just offer fruit again and repeat the process.
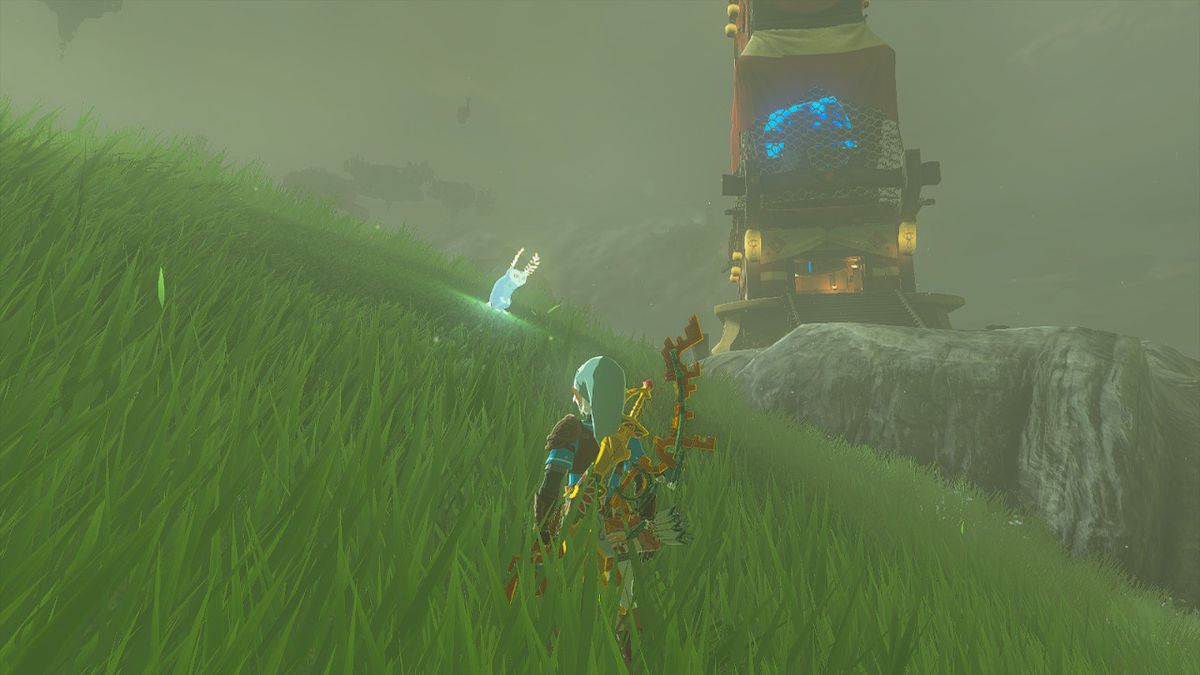
Image: Nintendo EPD/Nintendo via ProSpelare
Moving on, blupees are quite useful beings. These creatures, which look like rabbits, will take you to a cave entrance. All you need to do is get close to them, and they’ll start running to the cave. Oh, and if you’re low on rupees, smack the blupees to get some from them.
The other two methods are more situational, but equally helpful. The Sensor+ will track down any nearby objects or enemies that you mark in your catalog. I recommend taking a photo of a keese, as well as any specific mining ore that you’re on the lookout for, and then tracking either. Since they’re usually inside caves, they might give away a spot as you’re out exploring.
Speaking of which, keep an eye out for NPCs traveling the roads, as well as those at stables. Chatting with them usually leads to helpful bits of information, including nearby caves with loot.
Image: Nintendo EPD/Nintendo via ProSpelare
Caves and Bubbul gems
Remember that each cave has a Bubbul gem. To get your hands on it, you need to defeat the Bubbulfrog, which is usually roaming around inside a room or behind an obstacle — such as a locked gate or behind a rock, to name a few examples.
After you’ve completed “The Hunt for Bubbul Gems!” side quest, you should locate Koltin’s Shop. Koltin is happy to accept your Bubbul gems in exchange for clothing items and materials, including the Mystic Robe.
In order to get all of Koltin’s shop items, you’ll need 47 Bubbul gems. The lists below gather a total of 70 Bubbul gems, so take your pick! As a last tip for your own records, defeating a Bubbulfrog adds a checkmark to the cave icon on your map. This doesn’t mean that you’ve exhausted everything there is to see in a cave, mind you, but rather notes that you’ve already gotten the Bubbul gem available inside.
Happy spelunking in caves around Zelda: Tears of the Kingdom!
The best caves in Zelda: Tears of the Kingdom
All caves are bound to offer a decent reward for your time, whether it is a weapon, one of the pieces of an armor set, or a clue for a side quest. Depending on what you’re looking for, however, some of them are worth prioritizing over others.
Considering there are 147 caves in the game, what follows isn’t an exhaustive list by any means. That said, if you’re searching for specific materials, enemies to farm monster parts from, or mining ore spots, the following 11 caves will fit the bill.
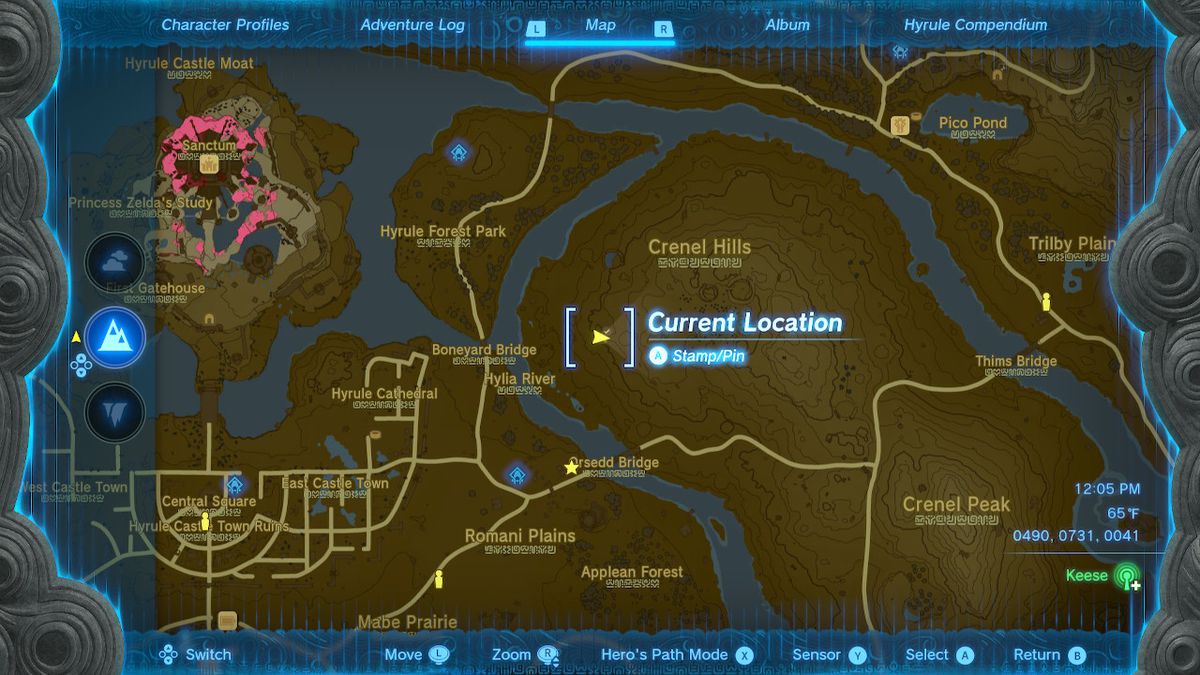
Image: Nintendo EPD/Nintendo via ProSpelare
Crenel Hills Cave
- Location: At the coordinates (0492, 0730, 0041), northeast of Lookout Landing, southwest of Crenel Hills.
- Loot: Luminous stone, hearty truffle, flint, bomb flower, as well as brightbloom seeds and brightcaps.
- What to expect: The cave is fairly straightforward — but there’s a Stone Talus boss fight that you can avoid, or confront.
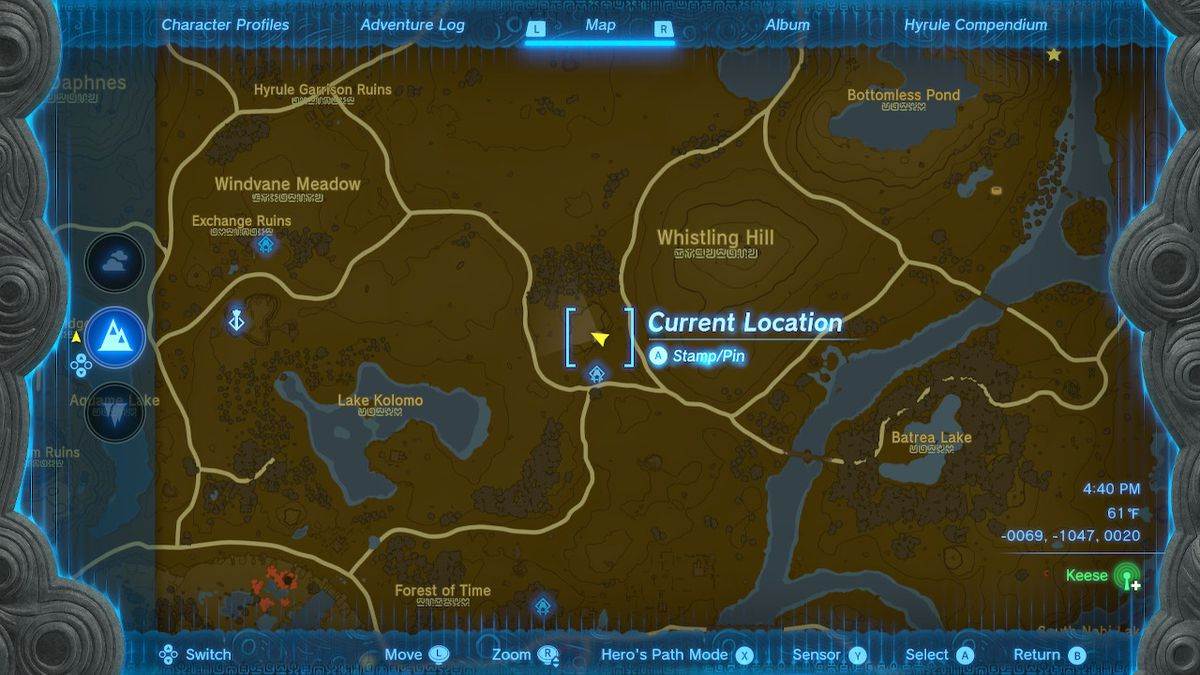
Image: Nintendo EPD/Nintendo via ProSpelare
Whistling Hill Cave
- Location: At the coordinates (-0069, -1047, 0020), southeast of Hyrule Field, close to Teniten Shrine.
- Loot: Diamond, amber, sapphire, opal, ruby, hearty truffle, flint, bomb flower, as well as brightbloom seeds and brightcaps.
- What to expect: Keese, Stalkoblins, and two Like Likes.
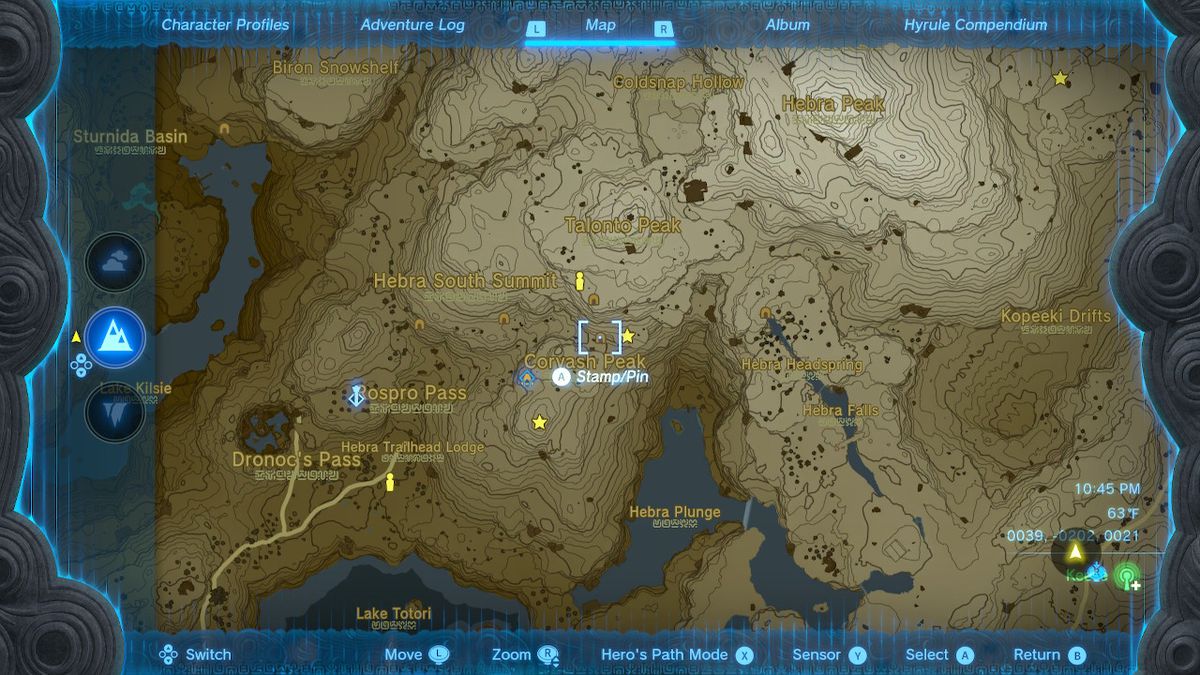
Image: Nintendo EPD/Nintendo via ProSpelare
Talonto Peak Cave
- Location: At the coordinates (-3211, 2463, 0348), south of Talonto Peak and close to the Hebra Mountains.
- Loot: This is a great cave to stock up on chillshrooms. There’s also ice fruit, flint, opal, and amber as well as brightbloom seeds and brightcaps.
- What to expect: Keese, Stalkoblins, and two Like Likes.
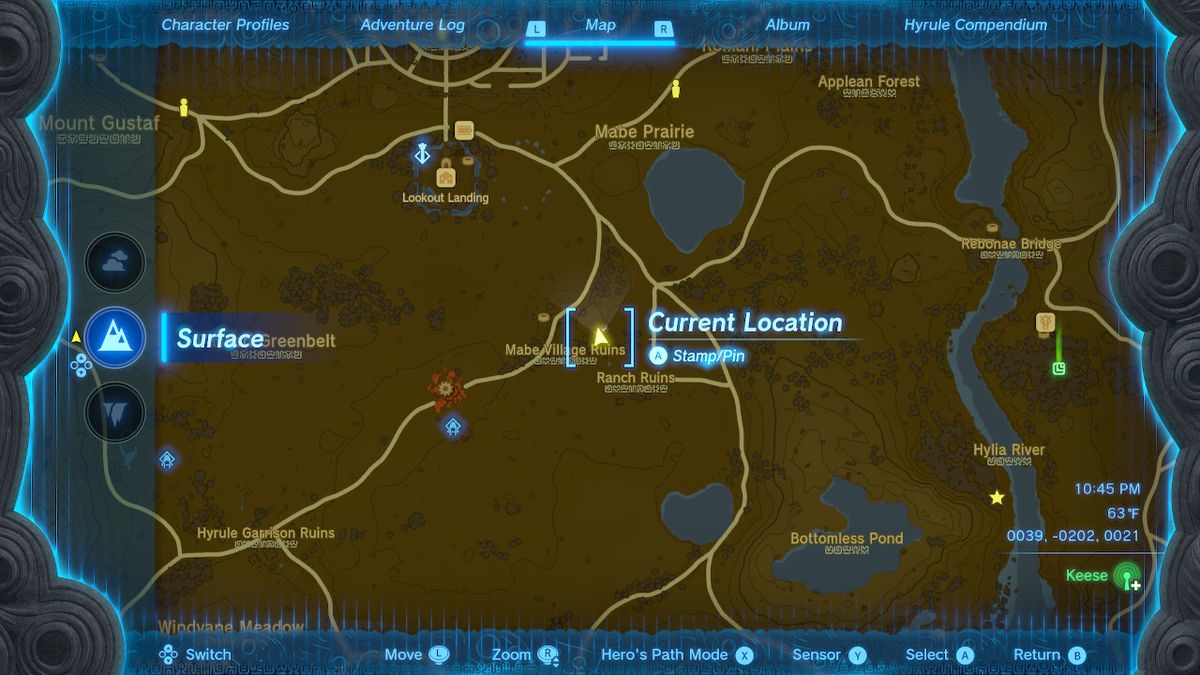
Image: Nintendo EPD/Nintendo via ProSpelare
Ranch Ruins Cave
- Location: At the coordinates (0039, -0202, 0021), southeast of Lookout Landing and close to Mabe Village Ruins and Ranch Ruins.
- Loot: This is a great cave to stock up on regular and giant brightbloom seeds and brightcaps early on in the game as you’re still exploring Lookout Landing’s surroundings. There’s also meat.
- What to expect: A single Horriblin — a good chance to Fuse a weapon with a Horriblin horn.
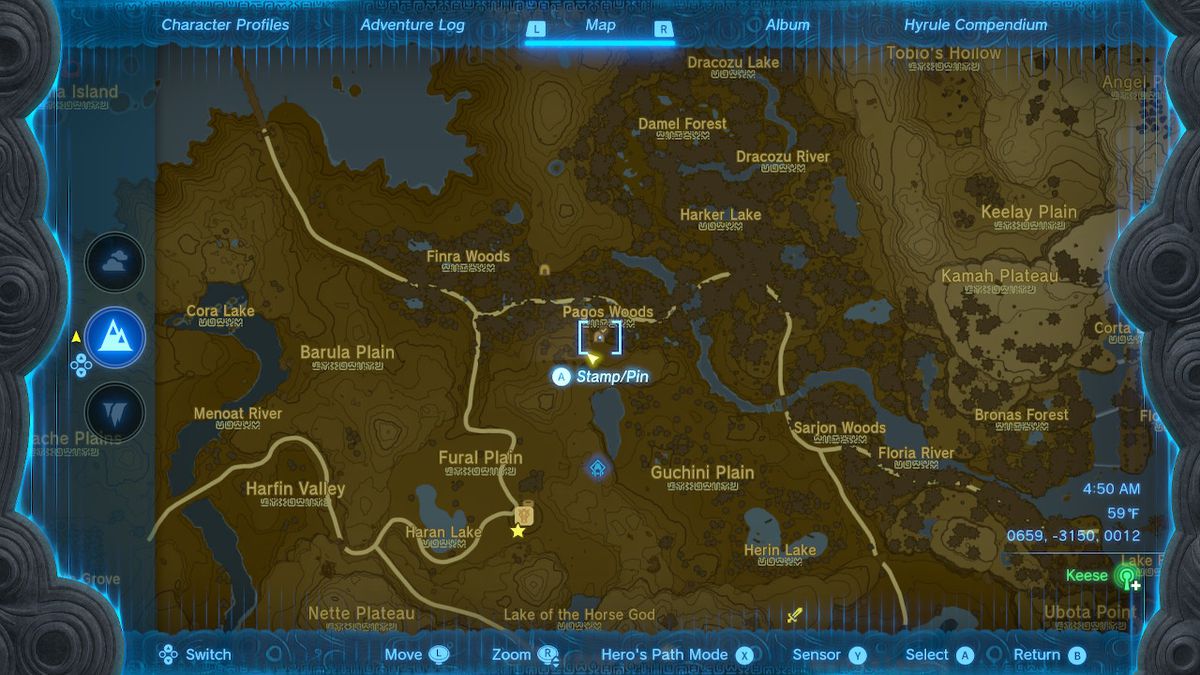
Image: Nintendo EPD/Nintendo via ProSpelare
Pagos Woods Excavation Site
- Location: At the coordinates (0671, -3110, 0026), southeast of Lake Hylia and north of Utsushok Shrine.
- Loot: If you’re looking for a large Zonai charge, there’s one inside the chest in this cave, after you solve a rather simple puzzle. Then, there are a bunch of Zonai devices to pick up and mix in case you want to create a vehicle of sorts for this area.
- What to expect: A fairly straightforward puzzle — use any objects from the cave to block the three red lasers.
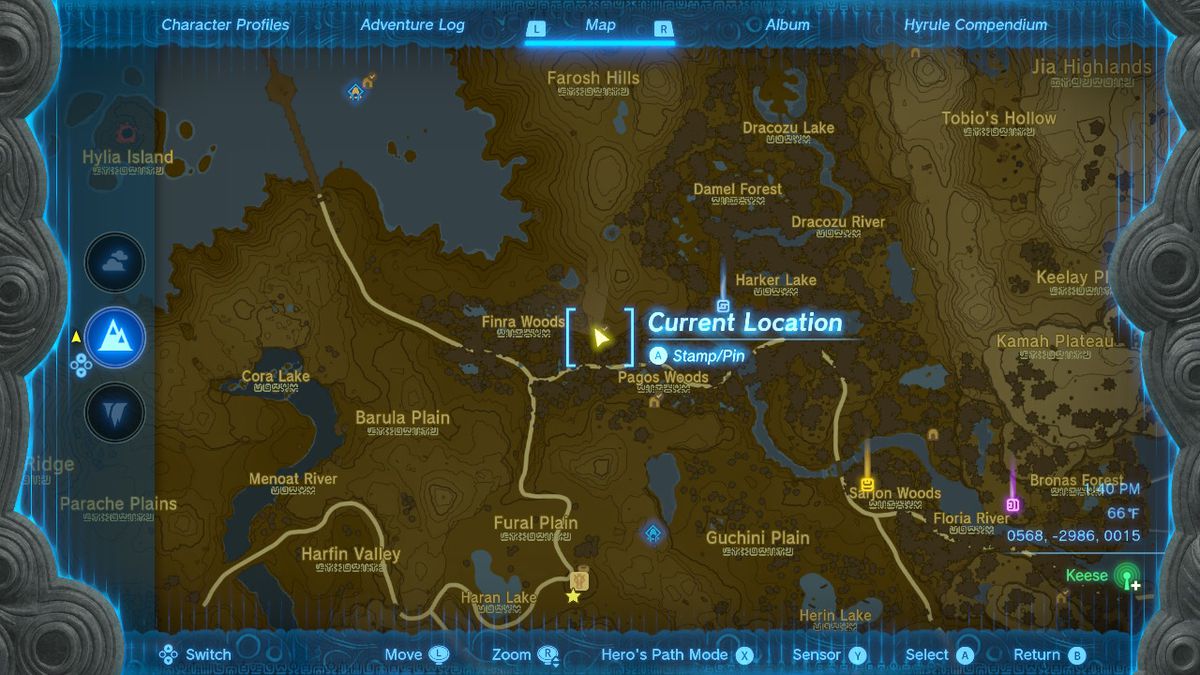
Image: Nintendo EPD/Nintendo via ProSpelare
Finra Woods Excavation Site
- Location: At the coordinates (0569, -2980, 0014), southeast of Lake Hylia and north of Utsushok Shrine — as well as northwest of Pago Woods Excavation Site.
- Loot: If you’re looking for a second large Zonai charge, there’s another one inside the chest in this cave, after you solve a rather simple puzzle. Then, there are more Zonai devices to pick and mix.
- What to expect: Another fairly straightforward puzzle — move the lever at the center of the room, and then use Recall to start it moving again while you enter the chest room.
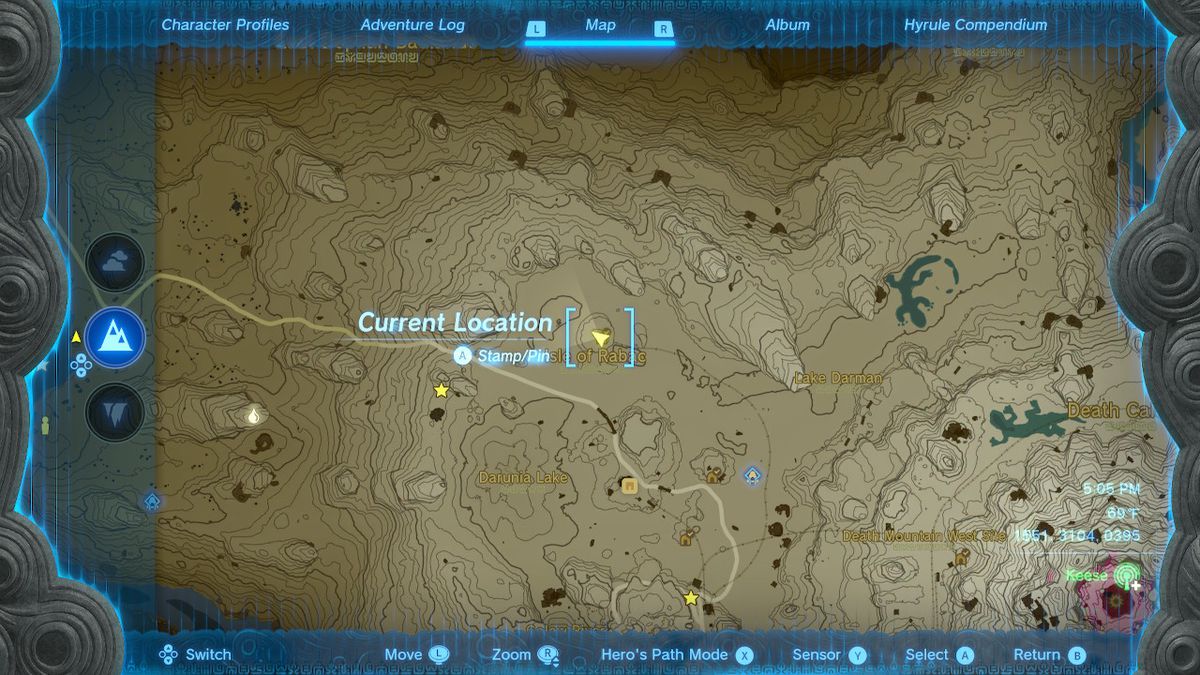
Image: Nintendo EPD/Nintendo via ProSpelare
Isle of Rabac Gallery
- Location: At the coordinates (1551, 3104, 0395), north of YunoboCo HQ and southeast of Eldin Mountains.
- Loot: Rock salt, coal, soldier’s broadsword with durability up inside a chest behind the like like, and smotherwing butterfly.
- What to expect: Keese, Like Likes, Bokoblins, Octoroks, and Moblins. Plus, some really fun mine carting to get used to dealing with heat resistance, as well as the reward obtained by completing the Fire Temple.
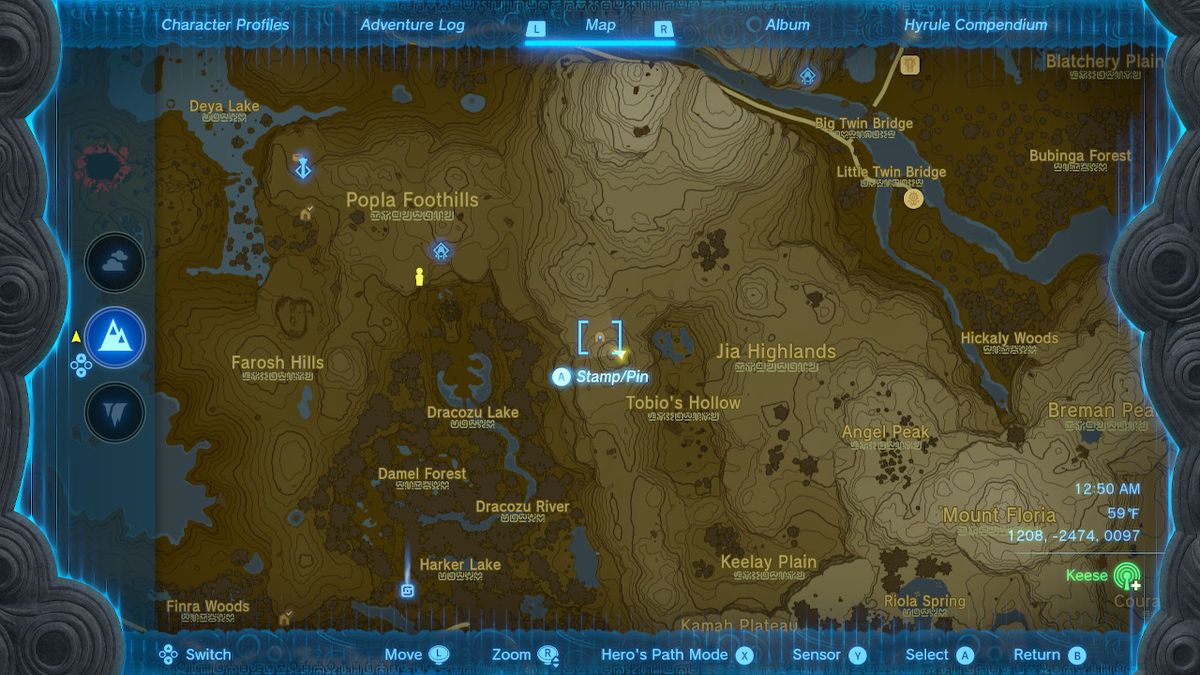
Image: Nintendo EPD/Nintendo via ProSpelare
Tobio’s Hollow Cave
- Location: At the coordinates (1165, -2440, 0170), southeast of Popla Foothills Skyview Tower, close to Tobio’s Hollow and Dracozu Lake.
- Loot: Amber, flint, luminous stone, as well as dozens of Keese, great for farming Keese eyeballs and wings, the former being rather useful for hunting certain dragon parts.
- What to expect: Keese, Chuchu, and a Like Like.

Image: Nintendo EPD/Nintendo via ProSpelare
Calora Lake Cave
- Location: At the coordinates (2009, -3168, 0180), southwest of East Necluda and Rabella Wetlands Skyview Tower, north of Calora Lake.
- Loot: Flint, luminous stone, arrows, flint, as well as loot from The Eldest Hinox Brother: Knight’s halbert, knight’s bow, knight’s broadsword, meat, black Hinox horn (27 fuse attack power), Hinox toenail, and Hinox guts.
- What to expect: A fairly dense cave with tons of luminous stone, resources, and a fight against The Eldest Hinox Brother. The boss drops some useful materials to combine with some of the best weapons in Zelda: Tears of the Kingdom.
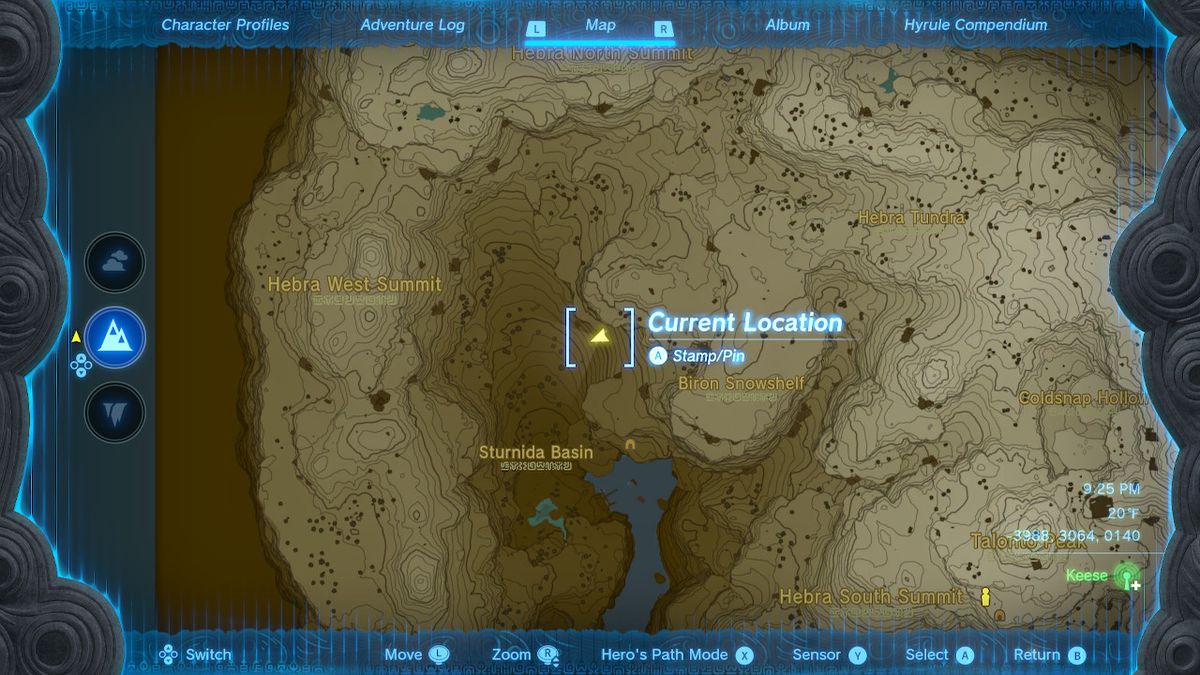
Image: Nintendo EPD/Nintendo via ProSpelare
East Biron Snowshelf Cave
- Location: At the coordinates (-3985, 3065, 0141), northwest of Biron Snowshelf in the Hebra Mountains.
- Loot: Amber, topaz, flint, rock salt, luminous stone, and ruby.
- What to expect: This cave is fairly simple, and you don’t need to worry about many enemies aside from the occasional Keese. There are quite a few mining ores, and you can kickstart “The Duchess Who Disappeared” side quest, too.
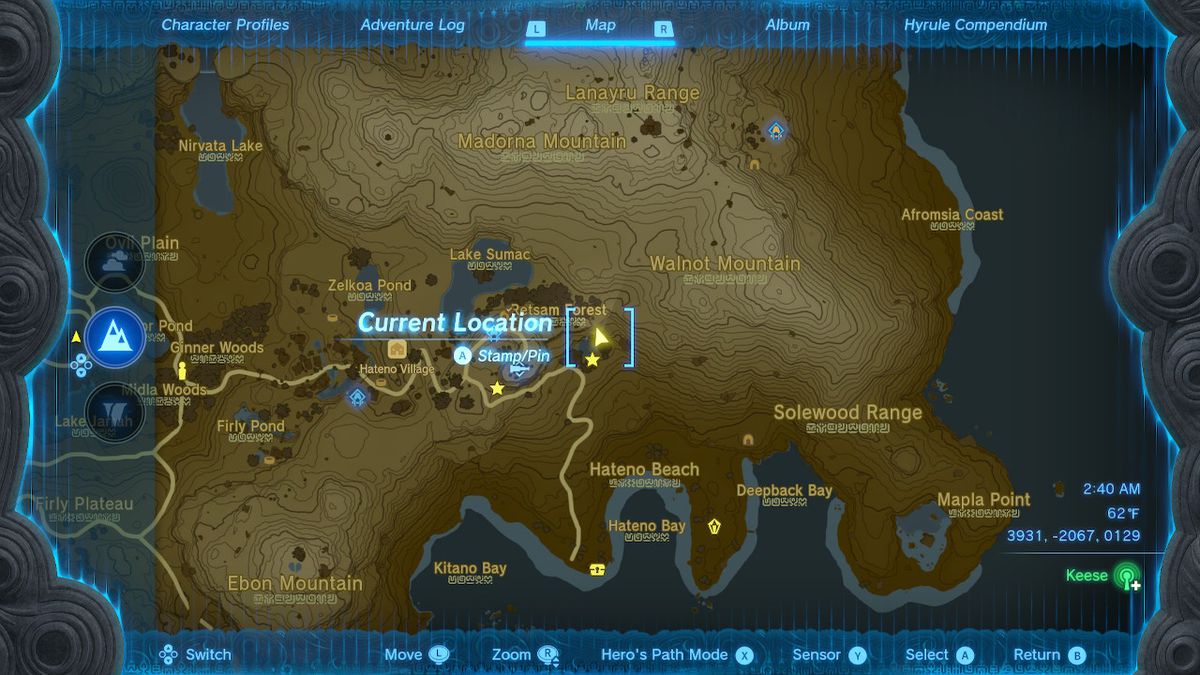
Image: Nintendo EPD/Nintendo via ProSpelare
Walnot Mountain Cave
- Location: At the coordinates (3931, -2067, 0129), northeast of Hateno Village and south of Retsam Forest.
- Loot: Flint, bomb flower, ruby, amber, sapphire, rock salt, diamond, soldier’s spear halberd inside a chest close to the Horriblins.
- What to expect: Horriblin, Like Like, Keese, Chuchu, black Bokoblins. It’s a perfect cave to farm rare materials from enemies early on in the game, and there are multiple mining ores around.
Image: Nintendo EPD/Nintendo via ProSpelare
All Skyview Tower caves
Each of the 13 Skyview Towers has its own intricacies. Inevitably, some of them are related to caves, which we’re highlighting below.
For more information, make sure to visit our dedicated Skyview Tower locations page.
Gerudo Highlands Skyview Tower
- Meadela’s Mantle Cave (-3978, -1249, 0429)
Sahasra Slope Skyview Tower
- Sahasra Slope Cave (1326, -1155, 0138 or 1376, -1197, 0135)
Popla Foothills Skyview Tower
- Popla Foothills Exploration Site (0608, -2213, 0052)
Image: Nintendo EPD/Nintendo via ProSpelare
All armor set caves
There are dozens of armor sets to hunt in Zelda: Tears of the Kingdom. Some might require for you to complete a specific challenge, while others take you to multiple caves across Hyrule.
For more information, make sure to visit our dedicated armor set locations page.
Awakening Armor set
- Goronbi River Cave (1423, 2100, 0286)
- Ancient Columns Cave (-3484, 0426, 0278)
- Coliseum Ruins Cave (-1147, -1261, 0046)
- Thundra Plateau Cave (-2272, 0866, 0111)
Barbarian Armor set
- Crenel Hills Cave (0484, 0729, 0041)
- Walnot Mountain Cave (3931, -2068, 0129)
- Robred Dropoff Cave (2487, -1467, 0013)
Climbing Armor set
- North Hyrule Plain Cave (-1188, 0646, 0072)
- Upland Zorana Byroad (2858, 0354, 0227)
- Ploymus Mountain Cave (3663, 0539, 0272)
Ember Armor set
- Goronbi River Cave (1415, 2108, 0287)
- Cephla Lake Cave (2591, 1332, 0153)
- YunoboCo HQ South Cave (1713, 2719, 0403)
Fierce Deity Armor set
- Skull Lake Cave (3352, 3423, -0138)
- Ancient Tree Stump (-1092, -0494, 0063)
Frostbite Armor set
- Brightcap Cave (-3002, 1641, 0201)
- Hebra Headspring Cave (-2897, 2511, 0393)
- Lake Kilsie Cave (-3930, 2859, -0015)
Phantom Armor set
- Puffer Beach Overhead Cave (0293, -3848, 0004)
- Tamio River Downstream Cave (-2911, -0795, 0010)
Rubber Armor set
- Whistling Hill Cave (-0061, 1056, 0019)
- Sarjon Cave (1195, -3161, 0027)
- Horon Lagoon Cave (4240, -0257, 0043)
Soldier’s Armor set
- Royal Hidden Passage (-0253, 0132, 0008)
Tingle Outfit set
- Cephla Lake Cave (2607, 1326, 0149)
- Dueling Peaks South Cave (1184, -1944, 0246)
- Dueling Peaks North Cave (1192, -1856, 0159)
- Cape Cales Cliffside Cave (3680, -3213, 0000)
Yiga Armor set
- Yiga Clan Maritta Branch (-0643, 2032, 0157)
Zora Armor set
- Ancient Zora Waterworks (3612, 0123, 0003)
Image: Nintendo EPD/Nintendo via ProSpelare
All shrine caves
If you’ve been procrastinating your search for caves, well, shrines are bound to intersect with it. While not all of them, there are multiple shrines that require for you to first discover them, or activate them, via one or more caves.
For more information, make sure to visit our dedicated shrine map and locations page.
Hyrule Field region
- Great Plateau Foothill Cave (-0833, -1489, 0027), related to Kyokugon Shrine (-0710, -1550, 0006.)
- River of the Dead Waterfall Cave (-1082, -2187, 0129), related to Tadarok Shrine (-2658, -2236, 0067.)
- Satori Mountain Foothill Cave (-2197, -0809, 0117), related to Usazum Shrine (-2140, -0873, 0093.)
Sahasra Slope regions
- Crenel Peak Cave (1202, 0329, 0027), related to Jonsau Shrine (1743, 0018, 0025.)
- Lanayru Road South Cave (2711, -1329, 0115), related to O-ogim Shrine (2755, -1089, 0100.)
Lindor’s Brow
- Gisa Crater Cave (-3931, 1090, 0092), related to Ikatak Shrine (-3950, 1138, 0112.)
- Tanagar Canyon West Cave (-3538, 0853, -0133), related to Iun-orok Shrine.
- Cave system west of Tabantha Hills Cave (-3079, 1618, 0243), related to Oromuwak Shrine.
- Lindor Brow’s Cave (-1734, 1167, 0230), related to Taki-ihaban Shrine (-1828, 1196, 0147.)
Gerudo Highlands
- Yiga Blademaster Station (-2428, -1821, 0147), Mount Nabooru Cave (-1797, -1950, 0038), and Gerudo Canyon Mine (-2677, 2413, 0079), all related to Suariwak Shrine (-2523, -1770, 0131.)
Popla Foothills
- Lake Hylia Whirlpool Cave (0104, -2517, -0087), related to En-oma Shrine (0104, -2517, -0087.)
- Deya Village Ruins West Well (0320, -1925, 0011), related to Susub Shrine (0348, -2050, -0026.)
- Tobio’s Hollow Cave (1161, -2429, 0172), related to Utojis Shrine (1217, -2542, 0096.)
Rabella Wetlands
- Mount Dunsel Cave (3290, -3304, 0066), related to Bamitok Shrine (3094, -3209, 0082.)
- Eventide Island Cave (4708, -3766, 0020), related to Marari-In Shrine (4632, -3712, 0018.)
- Oakle’s Navel Cave (2514, -2120, 0010), related to Tokiy Shrine (2304, -2377, -0028.)
Mount Lanayru
- Deepback Bay Cave (4231, -2178, -0012), related to Anedamimik Shrine.
- Lanayru Roast East Cave (3346, -1187, 0057), related to Jogou Shrine.
- Retsam Forest Cave (3760, -2060, 0212), related to Mayahisik Shrine (3730, -2057, 0189.)
Upland Zorana
- Ralis Channel Cave (2918, 0505, 0155), related to Joniu Shrine.
- Boné Pond East Cave (2254, 0098, 0136), related to Maoikes Shrine (2277, 0150, 0079.)
- Tarm Point Cave (4476, -0829, 0053), related to Yomizuk Shrine (4412, -0610, 0034.)
Eldin Canyon
- Eldin Canyon’s YunoboCo HQ East Cave (1842, 2841, 0363), related to Isisim Shrine.
- Isle of Rabac Gallery (1578, 3093, 0395), related to Jiotak Shrine (1833, 3179, 0257.)
- Death Mountain East Tunnel (2751, 2768, 0521), related to Momosik Shrine (2959, 2758, 0524.)
- Lake Intenoch Cave (2498, 1773, 0154), related to Moshapin Shrine (2678, 1905, 0131.)
Thyphlo Ruins
- Deplian Badlands Cave (0304, 3583, 0089), related to Minetak Shrine (0393, 3485, 0068.)
- Elma Knolls Well (-0669, 1349, 0088), related to Tenmaten Shrine (-0594, 1551, -0014.)
Pikida Stonegrove
- Kopeeki Drifts Cave (-2396, 2281, 0220), related to Nouda Shrine (-2319, 2201, 0173.)
Rospro Pass
- Hebra Mountain Northwest Cave (-2988, 3182, 0570), related to Rutafu-um Shrine (-2996, 3102, 0515.)
- West Lake Totori Cave (-3955, 2029, 0201), related to Wao-os Shrine (-4059, 1991, 0183.)